launch x431 Tool

Tango Key Programmer Software Installation and User Manual


Matched product:

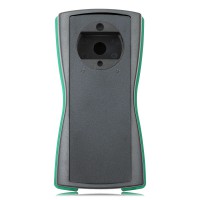
Original Scorpio-LK Tango Key Programmer V1.127 with Basic Software Support Toyota H 128 Bit Copy Function

Original Scorpio-LK Tango Key Programmer V1.127 with Basic Software Support Toyota H 128 Bit Copy Function

Latest price:1,049
9906% off
  • Item No. SK80
  • Free Shipping
Original Tango key programmer is a new generation of transponder programmer which is developed to cover, read, write and generate the latest transponders used in the latest vehicle immobilizer technologies.
How to install Tango Software

Tango Setup file link is here:
https://www.scorpio-lk.com/downloads-tango.html

System Requirements:
OS: Win XP, Vista 32bit; 7, 8, 10, 11 64bit
For XP, Vista & 7 all Microsoft Service Packs and Security Updates have to be installed.
1GB available storage space
Internet connection

1. Download setup file depending on your OS [Win 7, 8, 10 & 11 or Win XP, Vista]

2. Uninstall previous version
If you have never installed Tango software on your PC with a previously released setup file, skip this step.
If Tango software was previously installed on the PC, default path is “C:/ Program Files /Scorpio-LK/Tango” or “C:/ Program Files (x86) /Scorpio-LK/Tango” , uninstall it through the uninstall executable. To find where Tango software resides, right click on the Tango desktop shortcut icon > Properties > Open File Location.

3. Launch InstallOnline.exe (for Windows 7, 8, 10 & 11) or InstallOnlineXP.exe (for Windows XP & Vista) then follow its on screen instructions and prompts.

After main Tango software is installed, you will be prompted to install the required Microsoft Visual C++ libraries, which will initiate its interface. If you have them installed on your PC, chose either Reinstall or Repair option.

Finally the setup will initiate Tango’s USB driver setup. Make sure that Tango hardware is not yet plugged in the PC and press OK. For Windows OS 7, 8, 10 & 11 this will conclude the setup, after which connect Tango hardware and Tango.exe (or its desktop shortcut) can be started.

If you have Windows OS XP, Vista, after driver installation the driver is only pre-installed. To complete driver installation, plug Tango hardware to USB port and wait the standard Windows dialog appears: “Found new device”. Click the dialog and select “Install automatically”

4. Connect Tango to PC

5. Run Tango.exe, an automatic updates procedure will initiate and prompt you to download the latest software version.
Follow the on-screen interface.
Steps 6 & 7 below are automatic. Don't call any interface functions while they are running. Depending on your Internet connection they can take some time.

6. After latest software version is downloaded, Tango.exe will close and relaunch and initiate firmware update.
If it doesn't relaunch with the new software version you haven't installed the required Visual C++ libraries during Step 3

7. After firmware update is complete, Tango.exe will relaunch and prompt update of the built-in hardware timer.

8. Upon timer reset, restart Tango.exe. This is the final step of the setup. To download any auxiliary files select Help->Updates->Check Updates

Key Maker Usage:

Key maker usage consists of a four steps. The 4-th step is additional and depends on a vehicle model.
1. Open an immobilizer dump file.
2. Choose number of the key you want create.
3. Place a transponder into the coil and click the WRITE button.
4. In some cases the program asks you to save a modified immobilizer dump. This dump must to be written into the immobilizer.

First of all, take a look at this picture.  The "Loaded File" window displays the immobilizer file name. Ensure that a valid dump is stored. The "Maker" window displays selected maker name. Ensure the right key maker selected.

The "info" windows display an important information:
1. Original transponder---Informs you about type of the original transponder
2. Allowed transponder---Informs you what type of transponders is suitable for the key maker
3. Data location---The immobilizer memory may be stored in various chips, the description informs you about from where you have to read a dump. Some immobilizers can have various chipsets. In this case the field displays several possible chips. Find one of them inside of the immobilizer and read it.
4. Data size---Each chip has certain memory size, the key maker accepts files with the described size.
5. Data format---This field appears in case of 93CXX eeprom seria.

There are two standards of data layout:
Intel format and Motorola format or Little Endian and Big Endian respectively.
The data layout depends on a chip-programmer that is used for eeprom reading.This field informs you what kind of format is suitable for the key maker.Usually you can see that both formats are suitable. It means that the program can understand any data layout.

How to use Tango Key Programmer

Firstly, run the key maker interface according to the vehicle and read information in the "Info" window. Watch theData location field describes the memory chip. Find out the chip inside of the immobilizer and read it. Save the read data (dump).
Click the "OPEN IMMOBILIZER FILE" button and load the saved dump.
The program will analyse the dump.
If the dump is correct the "WRITE" button will become active and the "Keys" window will display the range of key numbers that can be created.
Take a look at the "Info" window, the Allowed transponder field.
Ensure you use a transponder exactly the indicated type.
Place the transponder into the coil.
Choose the key position you want create in the "Keys" window.
Click the "WRITE" button.
This starts the writing process and transponder will be stored with the appropriate data.
At this point you may be asked to save a new immobilizer dump.
The program displays a standard File Save dialog where you have to save the data.
After this you will be informed about the new data saved and must be written into the immobiliser.

Write the new dump into the immobilizer. Now it is ready to operate with the created transponder.If you are not asked to save a new file, it means that immobilizer is ready to operate with the created transponder without file replacing.

Finish

1. ABS plastic enclosure: ingress protection  IP65/DIN EN 60529
2. Rubber seal: prevents sliding on a workbench shock-proof function
3. USB connection:  no external power
4. Big hole:  adopted to large keys
5. Three small holes:  adopted to various sizes of transponders